This post demonstrates how to use UIScrollView with AutoLayout. The Scroll View will contain multiple smaller views. In my example, I will be using 3 UIViews with different background colors as the content of our scroll view.
The final code can be downloaded here: https://github.com/djsison/iOS-ScrollView-AutoLayout-MultipleContents
If you need a single view inside the Scroll View, please refer to the following link instead:
iOS: How to use UIScrollView with Auto Layout (Pure Auto Layout) – Single Content View
I will be using the pure auto layout approach as stated in this note:
https://developer.apple.com/library/ios/technotes/tn2154/_index.html
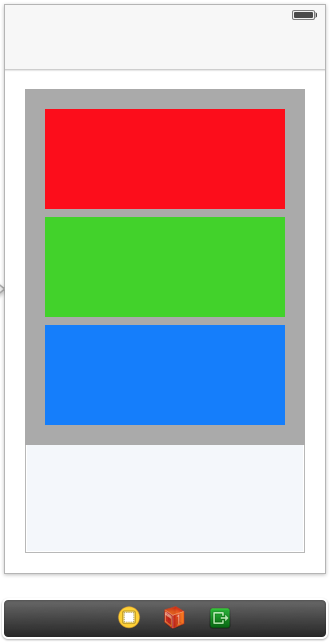
First, I define the appearance of my screen in the storyboard as follows:
- View (main view of myUIViewController) – with
- Scroll View (UIScrollView) – with Dark Gray background color
- Container View (UIView) – with Light Gray background color
- Content1 (UIView) – with Red background color
- Content2 (UIView) – with Green background color
- Content3 (UIView) – with Blue background color
- Container View (UIView) – with Light Gray background color
- Scroll View (UIScrollView) – with Dark Gray background color
This is what it should look like in the storyboard:
Some notes and tips first before defining the constraints for our storyboard:
- Do not think of the scroll view as having a fixed width and height.
- The contents of the scroll view will define the width and height of the scroll view (or, for more technical correctness, the content size of the scroll view).
- The size of the contents of the scroll view must not depend on the size of the scroll view.
→ For example, Content1, Content2, and Content3 must not only contain constraints that attach them to the top, bottom, left, and right edges of the Container View, but also a fixed width constraint and a fixed height constraint (each of these constraints must be defined in at least 1 of the content views). If no content view has these constraints, their sizes will depend on the size of the scroll view (since they are attached to the edges), but the scroll view also depends on the size of its contents, so an error is produced. - The scroll view must have at least 1 content that attaches to each of its edges, e.g. top, left, right, and bottom. This is so that the scroll view will know the bounds or limits of its content, which will determine the scroll view’s own content size.
Now, we define the constraints using the Storyboard.
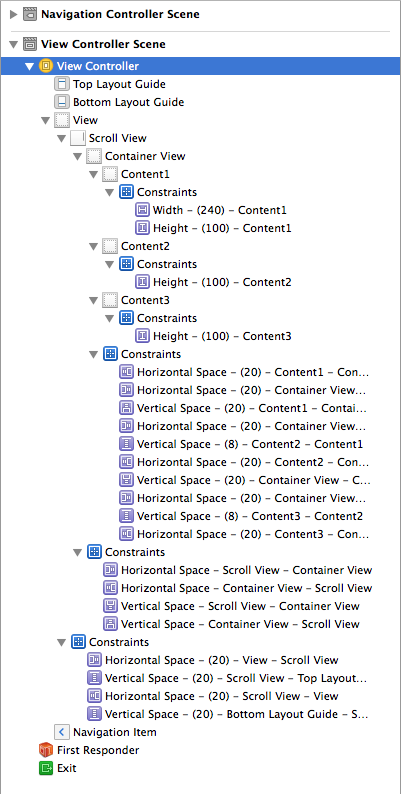
- Scroll View (UIScrollView): 20 leading, trailing, top, and bottom spaces to superview
You can change this to what you want, e.g. 0 each for leading, trailing, top, and bottom spaces so that the Scroll View takes all of the main view’s space. - Container View (UIView): 0 leading, trailing, top, and bottom spaces to the Scroll View
This is sort of fixed, unless you have a reason to do otherwise (e.g. to create a sort of a margin effect).
In the screenshot, the leading, trailing, top, and bottom space constraints are all set to 0. The content views are what defines the size of the Container View, which in turn defined the size of the Scroll View (but the real size of the Scroll View on run time is not reflected in the Storyboard). - Content1: 20 for leading, trailing, and top, 8 for bottom (this is the space between Content1 and Content2), and fixed width and height of 240 and 100.
Note that we defined leading and trailing constraints, together with a width constraint! If this view is inside another fixed-size View, Xcode may warn you of ambiguous or conflicting constraints. Also, we now have a view that attaches to the top, left, and right edges of the scroll view. The only one left is the bottom edge. - Content2: 20 for leading and trailing, 8 for bottom (this is the space between Content2 and Content3), and fixed height of 100.
Note that we did not add a constraint for width. This means that only Content1 will affect the content size of the scroll view. - Content3: 20 for leading and trailing, 20 for bottom (this is the space between Content3 and the superview, which is the Container View), and a fixed height of 100. Now, we also have a view that attaches to the bottom edge of the scroll view.
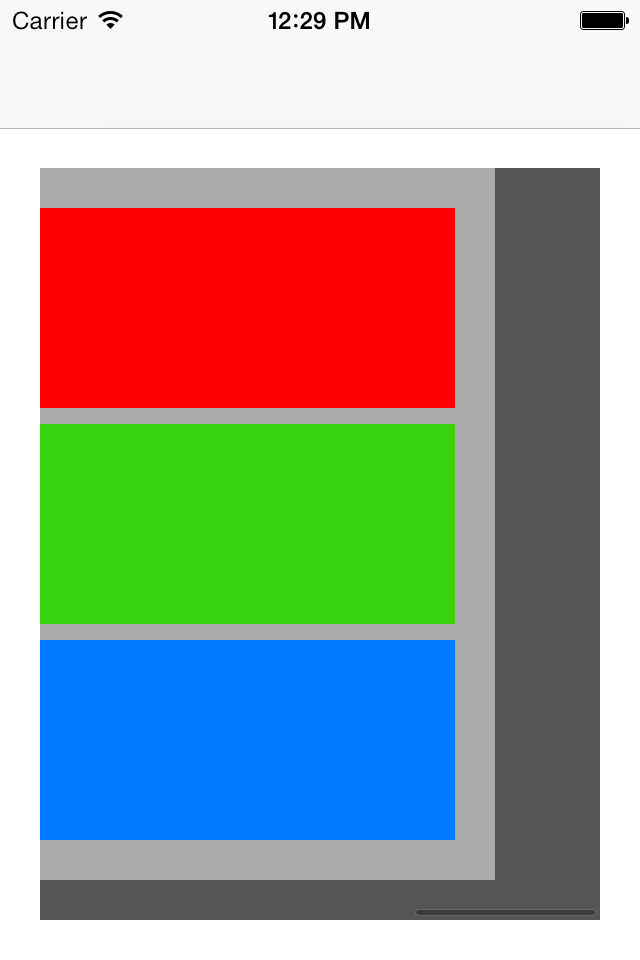
The storyboard is now complete! Try to run your app in the simulator using iPhone 3.5 inch, and see what happens.
Whaat! It does not scroll!
Don’t fret. This is expected, since our content views are still small enough to fit inside the scroll view.
To test our autolayout constraints, we can change the size of one of our content views, and see what happens.
Since I am feeling lazy right now, I will just change the width of Content1 in viewDidLoad of my ViewController.
Note that I have created IBOutlets for each of the width and height constraints of Content1, Content2, and Content3.
|
1 2 3 4 5 |
- (void)viewDidLoad { [super viewDidLoad]; self.content1WidthConstraint.constant = 500; } |
Run the app. You can now scroll horizontally!
Now, I will try to change the height of Content2.
|
1 2 3 4 5 |
- (void)viewDidLoad { [super viewDidLoad]; self.content2HeightConstraint.constant = 200; } |
Run the app, and now, you should be able to scroll vertically.

Congratulations! That’s it for autolayout and scroll views in iOS.
Note that you can use other views also, such as UILabels and UIImageViews.
If you have questions, please feel free to leave a comment below.


Good post!
Question: Isn’t content3’s height necessary?
Nice catch there! Updated the post to include a height constraint for Content3.
Thank you.
Chapeau.
You, and only you, have been able to explain in a simple and clear way how scrollviews works and which constraints they need in order to works in a correct mode. You may not believe to it, but I spent three days trying to figure how make working scrollviews without success. IMHO, Apple didn’t do a good job in Xcode 6’s IB. Many warnings pop up as I try to add constraints, but these warning make me more confused as I was before trying. Thank you again, DJ SISON.
Thank you too. 🙂
Glad you found this post helpful.
I found your post very helpful. Thank you!
Thank you for reading. 🙂
Would be even better with an example project.
Great idea! I will update the article with a sample project to boot when I have time.
Thanks.
Thanks!
You’re welcome!
Why do you put the content views inside a “container view”? Wouldn’t you get the same effect from putting the content views directly in the UIScrollView?
Sorry, no answer. I was just wondering about this, too.
Thank you very much 😀
You’re welcome! 🙂
Thanks so much for this. I’ve been pulling my hair out trying to get my scroll view to work. Finally – success! 🙂
You’re welcome! I’m glad you got it to work. 🙂
Hi there, i’m trying to do this, but with a horizontal scroll. After sometime i made it work, but now, i cant have a flexible height for use in iOS6 and iOS7! How can i fix this height?
By having a flexible height, do you want the screen to have both horizontal and vertical scroll bars?
Thanks for tutorial. I am following the same way but my UI is as below
UIView (view of ViewController)
— UIScrollView
——-ContainerView(I will add my subview in this view)
This container view contains collection view at top , uiview at the center & one more collection view at the bottom. Constraints are set as below
Top CollectionView :-
top & left = 8
height = 284
right = 0
Center view
top , left , right = 8
height = 120
Bottom collection view
top , left = 8
right = 0
height = 124. I have used height as I need to change the height constraint according to data received from server.
Container view
top , left,right = 0
bottom = -106 ( If I delete the bottom constraint , it shows error that scroll view has ambiguous constraints)
height = 700
Collection view at the bottom has dynamic contents & scrolls vertically.
But this doesn’t show bottom collection view fully. I can’t scroll until last cell of collection view.
Any idea ? Thanks
Have you tried setting the bottom constraint of the Container View to 0?
hi! i’ve read it few times and still cant get it: “For example, Content1, Content2, Content3 must not only contain constraints that attach them to the top, bottom, left, and right edges of the Container View. ”
“must not only contain”..
this “only” usually means that it will be “..but also blablabla” at the end statement
whether “only” is odd here, or “not” is..
please reformulate the statement, i cant understand it..
as it is for now, it turns out, that content 1, 2,3 must contain constraints, that attach them to the top, bottom, left, and right edges of the Container View, BUT ALSO must contain some other constraints
but it makes no sense.. or is it?
Thank you for your comment, I appreciate it very much.
I have updated the article, please check if you can now understand it. 🙂
With your layout, what do you expect to see in the screen? 🙂
thanks, now it is perfectly understandable.
and i wanted to ask, whether you going to wright similar article, explaining non-fixed constraints?
for example i was having hard time to make the following layout to work:
controller’s view
-scrollview
–view
—imageview (fixed size)
—uitextview (with variable text size depending on instance of a main view controller)
—button (fixed size)
—container view
—-table view controller (dynamic size)
i make less or equal and more or equal constraints for both textview and container view but i get “constraints ambiguity error”
is it possible to make this with autolayout?
i ended up with making outlets for height of those constraints and calculating their sizes in code, but i eager to know how to make this with autolayout, because my solution seems ad hoc and unperfect
oh, i forgot to mention
i expect to see the text in textfield with full text without scrolls and full table without scrolls
the only scroll is the top one with all content
here is a screenshot (it is scrolled down to bottom now)
https://s5.mzstatic.com/us/r30/Purple/v4/e9/b1/ab/e9b1ab0b-5b00-6ef6-fa81-beecc8cfb8fe/mzl.uxdacwpv.png?downloadKey=1395298604_a75e1fbfac15964172f6daabcdb0b0fb
actually, the table is hidden (by setting its height constraint to 0) and when the button (green) is pressed, it animates to visible (by setting height to height of table, calculated as cell height * cell count )
Sorry for the late reply.
I don’t think there’s a way to do what you want with the Table View without using outlets for the constraints.
So your approach is the way to go for me.
thank you! good to know an answer, whatever it is: problem solved!
as i can imagine, when building more or less complex interfaces, it is impossible to use only autolayout, but people use constraints’ outlets? for a long time i was thinking that one can build an interface of any complexity with just editor and i was angry at myself, that i can not..
Yes. I usually create outlets for size constraints.
Constraint outlets are especially needed when you want to animate a view which is autolayout-based.
and the last question if you dont mind =)
it is known, that actual size of content of controls become “valid” just after they being drawn on screen. so what is the best place in code to resize constraints accordingly? the question is also applied to cases, when content changes and constraints need update.
what is the “rightest” way to do that?
I usually place them in:
UIViewController’s updateViewConstraints
so, as i understand it’s updateViewConstraints of the “child” controller. and when its content changes i must call something like “setNeedsLayout” when content size changes? or is there any event that is shot when contentsize changes?
I’m not sure I get your question, but I usually update constraints in the “updateViewConstraints” method of my main view controller for the current screen.
If you manually change size of the view controller’s views, then you must call the view’s setNeedsUpdateConstraints method in order to trigger the updateViewConstraints method.
On the other hand, if you don’t manually change the view sizes, that is, if the system changed the size automatically (one example of this is when you rotate the device), then you don’t need to call setNeedsUpdateConstraints because the system will be the one to do that.
If you need an event for the changes in size of the main view (the one you call with self.view inside the controller), then you should look at “viewWillLayoutSubviews”.
For changes in size of the main view’s child views, I don’t know of any event that is automatically fired when size changes. If you discover one, kindly let me know. 🙂
hey excellent tutorial man! I’ve implemented it and put the code here
https://github.com/abbood/autolayout-scrollview-multiple-subviews
thanks again!
How did you add child-views into the Container View? With XCode 5 everything appears on the same depth. Also it is not possible to drag a view as child view to the container view?
What I mean by “Container View” in the post is just a plain UIView which we use to contain and group child views (subviews).
Maybe the “Container View” you are referring to is the Container View that was introduced in iOS 5, where you can embed a controller and its view within the Container View, which is different from the “Container View” in this post. 🙂
Thank you very much! Nice tutorial and the first one which really works on iOS7. And i tried out lots of them
Thank you! Glad it helped. 🙂
Really good tutorial! One question: You’ve set height and width constraints because you placed UIViews. Would you do the same with UILabel for example that has intrinsic size ? I obviously wouldn’t want to set a constant size, but let it grow/shrink based on its text. How would you tackle that ?
@Idan
Good question.
Right now, I can only think of setting the width and height constraints of the UILabel programmatically after determining its size based on the current text (similar to intrinsic size).
I’ll get back to you if I find a better way.
Actually played with it lately, and I think that if you just put a UILabel and give it 4 constraints, one for every edge, (instead of 2-3 that’s usually needed cause of the Intrinsic size), the scroll view will behave correctly. I can create a simple demo project if you want. Lemme know.
Hi Idan,
Could you link your test project please?
I have similar kind of design to my work. I would need your help. I want the the content views to be placed one after the other horizontally. Each view occupying the fram of say(750,700)in potraint and (1004,345) in landscape. I am facing lot of problems. Please help me. Thanks in advance.
Excellent tutorial. Thanks a lot for the insight.
Thank you too for reading my post.
Thank you, you almost solved all my issues, I am working with Xcode 6 and iOS8…still I have setContentOffset not working, leaving the offset to (0,0) is this a known issue?
Forget about this, it was my fault.
You are a lifesaver, thank you for this 🙂
I really enjoyed the tutorial but the scrolling does not seem to work in landscape. Am i missing something? I would think since content is determining scroll area but in landscape (even in your demo code) it is clipping view and fix.
Hmm.. I tried the demo application and it works as intended in landscape.
Did you use the demo application from my Github link?
Hey, I am following your example. Only that my content view is populated with subviews(textfields, buttons,labels). It is a regular data entry form. However when I run the app, I can scroll to the bottom but it immediately bounces back to a position on the content view where many fields on the view are hidden. What I mean here is even though I scroll with the mouse to the bottom of the view, I am unable to hold that position once I let go off the mouse it goes back to a position where quarter of the view is not visible. I don’t know what I am missing here. I have set the height constraint to each of the controls through the editor. For Compact Regular, The scrollview height for the iphone version is 1000 and the contentview has height of 2100. Please help me. I am stuck… Any help is appreciated. Thank you!!
Thanks a lot for the post, quickly solved my problems without turning off auto layout.
I follow your instruction, but the width of content views can not adapted to different devices. Could you give me some help?