I usually create a Settings entry for my apps to include an Acknowledgements screen, where I display info about the Open Source libraries used in the app. This article will show you how to create one, with two base elements:
- Toggle Switch – which I will use to turn something ON or OFF
- Child Pane – which I will use to display the Acknowledgements screen
The end product will look like this in iOS 7:
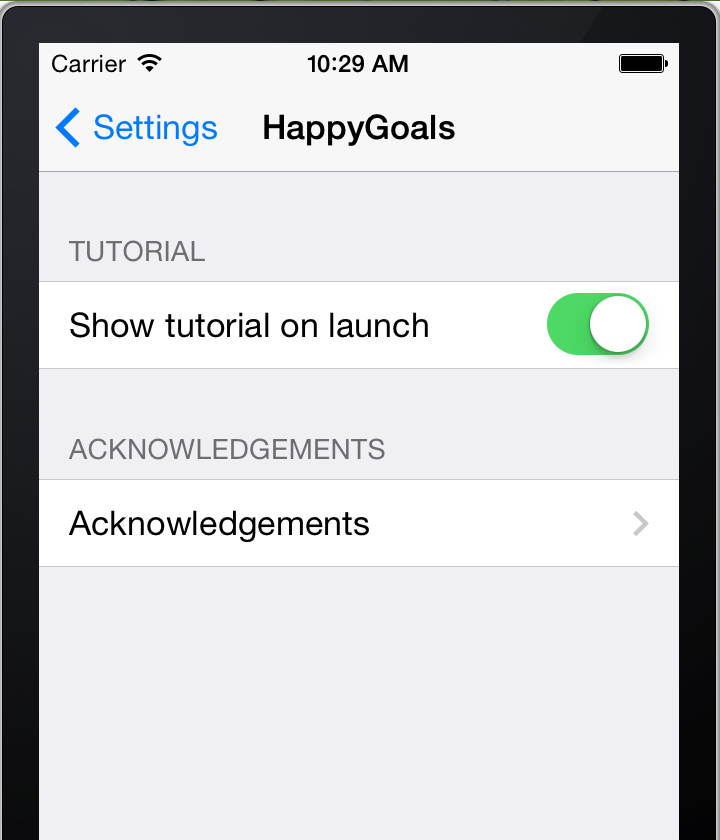
First Screen in the iOS Settings app

Second Screen in the iOS Settings app
Now, on to the tutorial!
First, we create the Settings Bundle.
- In Xcode, choose File->File… (or press Command+N)
- Select Settings Bundle
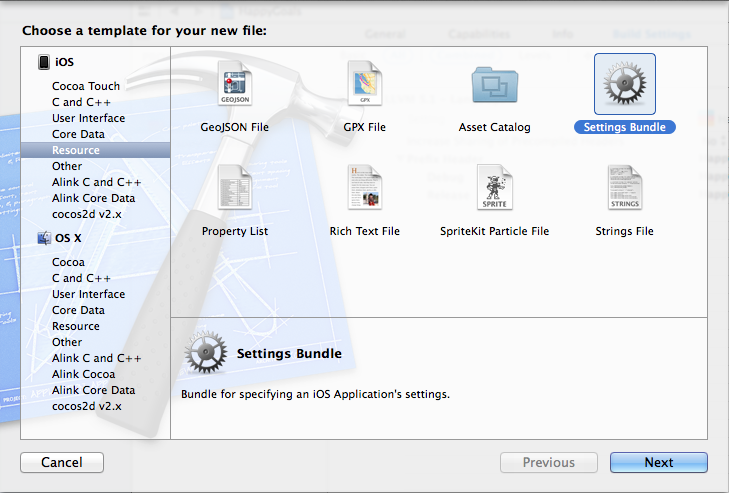
Create Settings Bundle from Xcode
- Then save it inside your project (I usually put it inside <ProjectName>/Resources).

Verify if your Settings.bundle file has been created correctly.
It should contain the following:
|
1 2 3 |
en.lproj/ Root.strings Root.plist |
Before we proceed with the next step, delete first the all Preference Items in Root.plist (delete Item 0, Item 1, …, Item 3).
In this tutorial, we will start from scratch.
Next, open Root.plist. We will create the first group in our Settings page.
This group will include the title of the group (we will name it “Tutorial”).
- Add a new Preference Item by clicking on the “+” button on the right
- Change Item 0 to “Group”
- Change the value of Title to “Tutorial”
After creating the group, we will now create the Toggle Switch that will be under the “Tutorial” group.
- Add a new Preference Item (Collapse Item 0->Right click on Item 0->Add Row)
- Change the new item (Item 1) to “Toggle Switch”
- Change the value of Title to “Show tutorial on launch” (you can name this with whatever you want)
- Change the value of Identifier to “SettingsShowTutorialOnLaunch” (this will be used the key when getting the current value using NSUserDefaults, e.g.
[[NSUserDefaults standardUserDefaults] boolForKey:@"SettingsShowTutorialOnLaunch"]) - Change the default value to YES or NO, depending on your needs. In my case, I will set it to YES.
You can try to run your app if you like. After running your app, go to Settings (in your iOS device or simulator), then verify if it looks like the following:
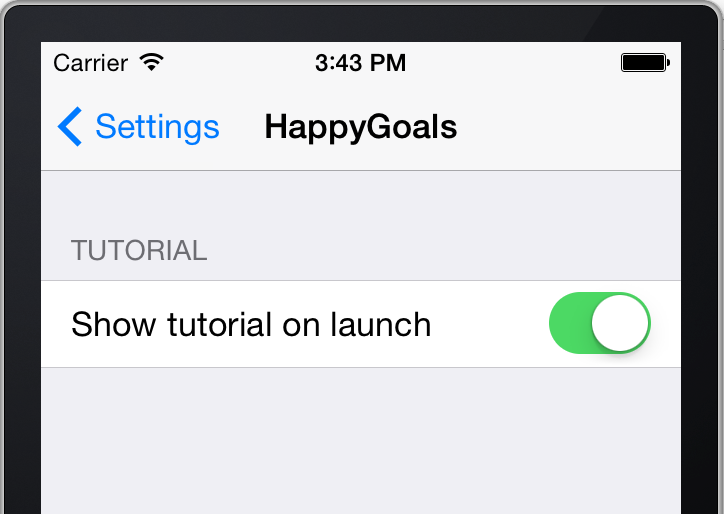
Toggle Switch in the Settings app
Now, we will create the second group. We will name it “Acknowledgements”.
- Add a new Preference Item (Collapse Item 1->Right click on Item 1->Add Row)
- Change Item 2 to “Group”
- Change the value of Title to “Acknowledgements”
After creating the second group, we will now create the Child Pane that will be under the “Acknowledgements” group.
- Add a new Preference Item (Collapse Item 2->Right click on Item 2->Add Row)
- Change Item 2 to “Group”
- Change the value of Type to “Child Pane”
- Change the value of Title “Acknowledgements” (or with whatever you like)
- Add a new item under Item 3 by clicking on the “+” button beside “Title”
- Select the new item as “Filename”
- Change the value of Filename”Acknowledgements” (or with whatever filename you like)
We are now done editing Root.plist!
You can now run your app to verify if the items have been added, but note that the Child Pane will not be displayed yet.
Only the group title will be added for now. See image below as reference to what your Root.plist should look like.
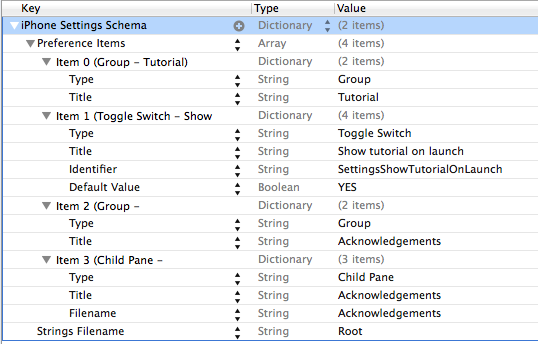
Root Plist for Settings Bundle
To generate the files related to the licenses, I use the script in the following post: http://stackoverflow.com/questions/6428353/best-way-to-add-license-section-to-ios-settings-bundle/6453507#6453507
In this article, I will add an acknowledgement entry for “EAIntroView”, which can be found here: https://github.com/ealeksandrov/EAIntroView
- Create a “Licenses” folder. I usually place it in “<ProjectName>/Resources/Licenses”. The Settings.bundle file is in “<ProjectName>/Resources/”.
- Place the script inside the newly created folder.
- For each acknowledgement you want to add, create a *.license file inside the folder. In my case, I will create a “EAIntroView.license” file.
- For each created file, format it according to the SO post above. In my case, I will remove the manual line breaks and replace them with a space. Also, I will put the name of the library at the top, before the Copyright sentence. This is my formatted file:
1234567EAIntroViewrCopyright (c) 2013 Evgeny AleksandrovPermission is hereby granted, free of charge, to any person obtaining a copy of this software and associated documentation files (the "Software"), to deal in the Software without restriction, including without limitation the rights to use, copy, modify, merge, publish, distribute, sublicense, and/or sell copies of the Software, and to permit persons to whom the Software is furnished to do so, subject to the following conditions:The above copyright notice and this permission notice shall be included in all copies or substantial portions of the Software.THE SOFTWARE IS PROVIDED "AS IS", WITHOUT WARRANTY OF ANY KIND, EXPRESS OR IMPLIED, INCLUDING BUT NOT LIMITED TO THE WARRANTIES OF MERCHANTABILITY, FITNESS FOR A PARTICULAR PURPOSE AND NONINFRINGEMENT. IN NO EVENT SHALL THE AUTHORS OR COPYRIGHT HOLDERS BE LIABLE FOR ANY CLAIM, DAMAGES OR OTHER LIABILITY, WHETHER IN AN ACTION OF CONTRACT, TORT OR OTHERWISE, ARISING FROM, OUT OF OR IN CONNECTION WITH THE SOFTWARE OR THE USE OR OTHER DEALINGS IN THE SOFTWARE. - If you target iOS 7, use “FooterText” instead (as stated in the SO post).
- Run the script!
You can verify if the script worked correctly if the following files have been created inside Settings.bundle:
- Acknowledgements.plist
- en.lproj/Acknowledgements.strings
Run the app! Your screens should now look like the end product:
First Screen in the iOS Settings app
Second Screen in the iOS Settings app
That’s it! Was that easy for you?
Please leave a comment below.
References:
https://developer.apple.com/Library/ios/documentation/Cocoa/Conceptual/UserDefaults/Preferences/Preferences.html
http://stackoverflow.com/questions/6428353/best-way-to-add-license-section-to-ios-settings-bundle/6453507#6453507


Thanks man, you save my life. 😀
I keep getting a Shell Script Invocation Error when I attempt to build it.
You may need to turn on “execute” permissions for Xcode, for your script. Launch Terminal and navigate to /Resources/Licenses and execute “chmod 755 yourScriptName.pl”
Thanks for the great tutorial!
How do I get that bar to click on the settings to show up on the page, and how do I make it open the settings page? Also, does it need to be a multi-page application? I am currently using a single-view.
The iOS Settings page cannot be opened within a 3rd party application. The user needs to manually go to iOS Settings himself.
Yes you can, if your app has a pref panel. You can use this code
BOOL canOpenSettings = (&UIApplicationOpenSettingsURLString != NULL);
if (canOpenSettings) {
NSURL *url = [NSURL URLWithString:UIApplicationOpenSettingsURLString];
[[UIApplication sharedApplication] openURL:url];
}
@Mattia
You are right, we can now open the iOS Settings application using the code you have provided.
We need to note though that “UIApplicationOpenSettingsURLString” is available in iOS 8 and up only, so if we run your code in iOS 7, the “canOpenSettings” boolean variable will be “false”, which means that the Settings application will not be opened.
@Mattia
Thank you for the tip. I will try to write an article about this too. 🙂
Is it possible to display the Acknowledgepart within the app?
Yes, but you need to implement your own view controllers.
Hi,
I have one question.
We have two entries, let’s say:
Value1: 10
Value2: 11
It is possible to add a constraint to the second value to be smaller than the first value ?
Thank you
@Geo: I dont think that’s possible right now. You will be better off putting the settings screen in your app (in-app) instead for now, to achieve the constraint you want. The iOS Settings settings are sort of fixed settings.